
RETECHNOLOGY PREMIUM MARKETPLACE RELATED PRODUCTS | WEBINARS | SPECIAL OFFERS


You are viewing our site as an Agent, Switch Your View:
Agent | Broker Reset Filters to Default Back to ListTake Better Real Estate Photos with Your iPhone
March 21 2013
 We're going to come right out and say it: it's not altogether a terrible idea to take property photos with your iPhone. While smartphone images still can't compete with those taken by a professional photographer (and yes, with a professional camera), each successive generation of iPhone boasts a steadily improving camera. And the advantage of using your phone is obvious – it's the camera you always have with you!
With a few handy tips and some practice, you can use your phone to take some pretty decent photos. First, we'll talk about the camera differences in different versions of iPhones, then we'll give you eight great shooting tips and finally discuss some fun camera add-ons.
Camera Details
 iPhone 4: The iPhone 4 has a 5 megapixel camera with flash, zoom and one-touch focus.
iPhone 4S: The 4S has an 8 megapixel camera with the above features and HDR (see below).
iPhone 5: The 8 megapixel iSight camera has improved HDR capabilities – for better color and reduced motion blur – and improved visibility in low-light settings. The iPhone5 also has a new panorama feature that works with an internal gyroscope to create seamless photos... hello scenic front yard or wide open floorplan!
Tips & Tricks
Shot List: No matter what type of camera you're using, start by creating a 'shot list' – a list of every picture you need to take at the property. That way you won't forget any crucial shots while you're there. No more driving all the way back to photograph the linen closet!
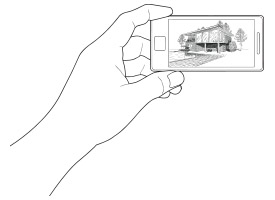
Orientation: Take advantage of the horizontal scale of most computer monitors and take photos with a landscape orientation (see pic at the top of this post), rather than in a vertical, portrait style. Rooms will seem larger when photographed this way, too.
One-touch Focus & Exposure: iPhones have a magical autofocus feature that is super simple to utilize. While composing your shot, simply place your finger on the screen to tell your camera where to focus. It will simultaneously set exposure – essentially lighting – to suit that area. Try touching the screen in several areas to see what look you like the best.
Flash: Your camera's flash setting can be set to On, Off or Auto. To change it, just touch the lightning bolt at the top of the screen. You will generally want flash to be off for the majority of exterior and interior photos
 Zoom: You can make a pinching motion with your fingers on your iPhone screen to zoom in or out. Because the iPhone only has a digital zoom with no actual moving lens components, zoomed in pictures tend to appear grainy. We recommend that you avoid zooming whenever possible.
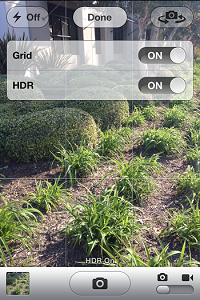
Grid: Grid is an iPhone camera feature that, when enabled, provides a thin grid of horizontal and vertical lines over the display screen. Turning the grid on when you're taking pictures will help you compose your short according to the 'rule of thirds' and make sure the subject is level. Grid is especially helpful when photographing properties – you don't want your listing to look like it's been built at a funny angle. To turn on grid, tap the Options button at the top of your screen and toggle Grid to On.
 HDR: HDR (iPhone 4S and 5 only) stands for High Dynamic Range. When you toggle your HDR setting On, your camera will take three photographs at once, with different exposures. It then layers the best parts of each one to create one photo that has the best combination of shadows and lights. Be sure to stay really still when you take HDR photos to avoid blur.
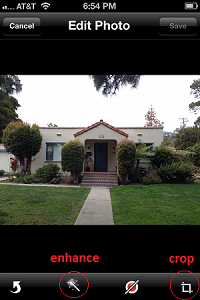
Edit: You can do a little editing from the Camera Roll after you've finished taking photos – this is called 'post production' in the photography biz. Simply click on the photo you'd like to work on, press the Edit button in the top right corner, then use the buttons at the bottom of the screen to enhance, crop or rotate your image. (You can reduce red eye, too, but you probably won't use that trick on your property photos.)
Add-Ons
Camera+: This beloved, easy-to-use app (currently on sale for $.99) has tools to help you adjust clarity, edit lighting and more. Take photos in the app or import from your phone's existing photo albums. Use the Camera+ stabilizer feature to take sharper photos.
Tripod: If you have shaky hands or just want to line up shots like a pro, you can buy a tripod specifically made to work with your iPhone.
Wide-Angle Lens: You can add a wide-angle lens to your iPhone to almost double your field of view – this is particularly good for architecture and interior shots. We recommend the olloclip, but there are many different options out there.
There you have it! Your smartphone pictures will come in handy for buyer and seller communications (you can even text them!), urgent property situations and modestly priced listing photos. Practice taking shots of your own house and your friends' homes until you feel comfortable.
You don't have to take our word for it! Check out this agent's test photos using the iPhone 4s and see for yourself. The shots look great, but he concluded that sellers would not take your marketing efforts seriously if you didn't bring a 'real' camera. Do you agree?
Would you like to write a guest post featuring smartphone photography tips for Android users? If so, give us a holler. We'd love to hear from you.
To view the original article, visit the Point2 blog.